9th September 2024
Introduction to Animation- Project 1, The bouncing ball
Terminologies:
During this session, I learned many new terminologies that will be important towards learning animation. For example, the term ‘Frames Per Second’ is very important to animation as it’s how many frames there are in a second. I had to animate at 24 fps (frames per second) which is the same fps in a cinema. How many fps will change the speed of the animation so it was very important to have that fact in mind. The term animation itself means a handful of drawings or pictures that create the illusion of movement.
Adobe Animate:
In this session, I had to do our animation digitally on a software called ‘Adobe Animate’. I had to use this software to animate a bouncing ball. I used the oval tool to make a circle at the top left of the canvas (the canvas is where I animated the ball bouncing). Next, I had to insert a keyframe, which is the next image in the sequence. This creates the illusion of movement. By inserting the keyframe, it allowed me to use the select tool to select the ball I have placed and move it anywhere. In this case, I had to move the ball just a little bit to create a sense of movement. I wanted to create an arch for the starting point of the ball. However, it is difficult to animate without seeing the frame made before meaning I could mess up the trajectory of the ball.
This is where I used the tool onion skin which allows me to have a preview of the images on the other keyframes. Using the knowledge that I have gained, I used it to make a moving ball. I was then told how to reduce the size because I needed to make the illusion of the ball stretching/squishing.
Reflection:
However, I spent too long trying to perfect the look of fluidity and materialism of the ball that I kept making mistakes and started to make the bouncing animation again. The time for me to make my animation was up so I was left with an unfinished animation. This session taught me a lot of how the process of animation works, so I’ll definitely use this experience in future sessions.

12 Principles of Animation
For this session of animation, I aimed to know what the 12 principles of animation are and what they mean for the production of animation. This will also be my first time using a graphics tablet, so I aim to be more confident with using my hand freely on a graphics tablet. Since I learnt all 12 principles, I will be explaining all of them to show my understanding of the terminologies.
Terminologies:
-The first principle is ‘squash and stretch’, which is when the object or characters in the animation squash and stretch to give the animation a sense of weight and flexibility.
-Next is ‘anticipation’, which is a motion or movement that prepares the audience for what they are about to see which makes the actions look more realistic.
-‘Staging’ is important as it’s where you place the subject in the shot to direct and highlight the audience’s attention to them.
-The ‘straight ahead & pose-to-pose’ are approaches on how to draw the animation. You can either draw each frame from beginning to end or start with the beginning and end result and then drawing the frames in between.
-The ‘follow through & overlapping action’ is very complicated as it shows that not all parts connected to the main body move at the same speed. For example; a cape on the back of a body will have to catch up or stop moving a bit later after the main body has stopped moving.
-The sixth principle is ‘slow in & slow out’ which shows that all movements have acceleration, so it is key when making each frame for a movement, it slowly starts to move before speeding up.
-‘Arc’ is to make movements more natural by picturing a curvature line in joints or body parts so movements don’t look mechanical and robot-like. A ‘secondary action’ is just giving a simple action (like walking) more life and personality. ‘Timing’ is just the number of frames relating to the speed of the animation. ‘Exaggeration’ is simply over emphasizing a movement or an action to add more humour or a cinematic feel. ‘Solid drawing’ is taking into account how the characters and objects fit in a 3 dimensional space. Finally, there is ‘appeal’ which is shaping the character to give more personality and an understanding of that character.
My Understanding:
Taking all of these principles into mind, I was then asked to use the graphics tablet to animate my first animation. I used a ‘pen tablet’ to animate and it connects to a PC via a USB cable. The PC screen maps to the surface of the tablet, with the pen acting as a mouse input. The tablet has hot keys on the side and pen buttons that can be customised. With the pen tablet, I was able to create custom shapes without using the shape tools. With this in mind, I used my knowledge of keyframing from the bouncing ball animation and tried to make an animation.
My 1st Time with the Pen Tablet:
There were choices to animate, like changing a neutral facial expression to something more expressive like anger, sadness or surprised. Instead, I chose to animate a person’s head banging on the table because I found the changing the expressions task a bit too hard. The animation would start off with a person sitting upright and then smashing his head onto the table. I started off by trying to draw a person’s top-half and a line to look like a flat surface or a table. I need to get used to using and making shapes with the pen tablet. When first using it, my hand was shaking to much and I couldn’t make the shapes I wanted. I then drew something that resembled a person and then inserted the next keyframe. I wanted to animate The person moving slightly from the first frame so I put on the onion skin tool to see the frame before so I can put the nest frame in the right place. I continued this process for four frames and tried to run the animation for the first time.
My Mistakes:
At first, it didn’t look right because I can see all of the frames just staying there and not disappearing to show the next frame. I thought it was because the onion skin was turned on which shows all the frames. The mistake I made was that I inserted a keyframe not a blank keyframe. Inserting a keyframe means that the frame before is showing in the next frame. By inserting a blank keyframe, I’m able to make the frame before and move onto the next one.
The Result:
Now that my mistake was fixed I was able to make a looping animation of someone banging their head on the table. One of the animation principles I used was ‘slow in & slow out’, which was making the person move slightly before hitting their head on the table. I then added another principle to my animation which was ‘exaggeration’ because my animation looked too simple, so I added an extra frame after the head which on the table and it was the head going splat on the table to create more humour and make it look more interesting. This session was a valuable experience and I will sure use the mistakes I made and the methods and principles I learnt going forward into my journey of animation.

16th September 2024
Cinematography
For this session, my objectives were to understand how cinematography affects a visual narrative and to practice composing different shot sizes. This will help me with my understanding of where the camera placement will be in either in animation or filming in general. By the end of the session I should be able to know where to place my characters in the canvas when animating in the future.
I first started off with why people making films or animations choose their camera shots carefully. The answer was because the camera placement strengthens the narrative of the story in the current camera shot. The meaning of a ‘camera shot’ is the amount of space that is seen in the frame. The frame could include the film’s setting, characters and themes and the type of shot helps build the meaning in the film. All of the camera shots that will be explained can be used in films, photography, animation, magazines, postcards, posters and print advertisements.
-The ‘Extreme Long Shot’ is simply a frame with a large amount of landscape and can be at the beginning of a shot.
-The ‘Long/Wide shot’ shows a specific setting, like a room.
-The ‘American shot’ is taken from a French term because the shot is used in western films, like a shot starting at knee level to reveal a cowboy with a weapon.
-’Mid shot’ has the character from the waist up. ‘Two shot’ has more than one person in the frame.
-’Shot Reverse Shot’ shows the character over someone’s shoulder.
-The ‘180 Degree rule’ is when the camera has to stay on one side of the character's interaction.
-’Close Up’ is a face taking up the frame which shows more emotion.
-’Extreme Close Up’ has one part of the face to create an intense mood.
-There are camera angles that help strengthen the narrative, like the dutch angle shows confusion.
Next I had to roughly sketch 3-4 of the cinematography shots. I decided to do the ‘Extreme Long Shot’, ‘American shot’ and ‘Extreme Close Up’. I used the graphics tablet to draw these and the outcome was great in my opinion. This session gave me an insight of how to use these shots to animate in the future.
.png)
.png)
.png)
For this session, I moved away from animation to learn about audio in media production. I aimed to develop my understanding of how original audio is created for use in media production and to practice using audio hardware to produce original sounds.
Importance of Audio:
Audio is very important when telling a story through visual mediums. For example; a character without dialogue would not be the same with dialogue. George Lucas, a famous director, said that “ The sound and music are 50% of the entertainment in a movie”. This shows that audio is very important as you are ‘missing half the picture’.
3 Types of Audio:
There are 3 main components that will make up the soundscape. ‘Foley’ are sound effects that are made or recreated in post-production. ‘Music’ sets the mood and tone for the audience. ‘ADR’, which stands for Automated Dialogue Replacement, is dialogue that is not recorded in-camera or on set.
Microphones:
There are also 3 microphones that I will be using and testing. Each one of these has its own Pickup Pattern. The pickup pattern determines the area and how far the microphone will pick up sound waves from. The H2 Handy ZOOM Recorder records audio from its built in microphone at a directional stand point and will record with a span of 120 degrees. The RODE NTG2, commonly named the shotgun mic because of the handle that comes with it, is also directional and records sounds from a metre. This is commonly used in movies so the microphone won’t get in the shot of the camera. The AKG D230, commonly named the reporter mic because news reporters use it, its omnidirectional meaning it picks a sound from every direction. However, its range is very short and the sounds have to be recorded up close.
Recording Practical:
Next, it was my turn to test the microphones and make some sound effects and dialogue of my own. I used the ZOOM recorder and the reporter mic to record my sounds. I connected the ZOOM recorder and reporter mic together. I also used headphones to hear what I’m recording and to adjust the settings on the recorder. The recorder won’t be directly picking up the noises and dialogue. It’s the mic that will be picking up the sounds and will be sending it to the recorder to save it there and to direct it to the headphones. The settings on the recorder are to change the volume of sounds picking up, pause and start recording, and to check the levels of sounds. The reason why I’m using the mic is because it can only pick up specific sounds. I recorded myself knocking on the table, keyboard and mouse clicking, opening a book and a dialogue. This gave me a greater understanding of how to work with audio.
The audio:
Knocking on table/door:
Keyboard and mouse clicking:
Opening a book and writing in it:
Dialogue:
In this session I had to trim, normalize and export audio from Adobe Audition and build up my confidence with Adobe Animate’s tools by creating a lip-synced animation using my own audio. This new step in animating was very difficult and confusing which resulted in me learning from my own mistakes.
Understanding the terms and instructions:
Adobe Audition wasn’t available, so another audio clip had to be used. I used the audio clip that my teacher gave me which was from the film ‘The Room’ which had the lines, “Ahahaha… What a story Mark”. Before we started animating, I learnt what ‘flaps’ are, which is the term animators refer to as lip movements. Lip-sync is matching flaps with spoken vocals to create the illusion of speech. There are specific shapes for flaps that look like it makes the sounds in a word, so to start off I drew all the lip shapes on a single keyframe so I can re-use them when animating.
The attempt of syncing audio with flaps:
I then imported the audio into animate and it showed the soundwaves of the audio. This will be helpful later as it tells me when to put the flaps. I ran into a problem where I couldn’t move my flaps onto the template that my teacher gave me. I tried copying it onto another blank keyframe and it wouldn’t appear. This caused problems and I had to animate the flaps individually on each keyframe where the sound is made. In the end I tried doing it again with extra help with my teacher to copy my flaps onto the template to make the flaps consistent.
Reflection:
This has helped me to understand the difficulty of animating with audio because of the many layers that I have to work on and the flaps being difficult for me to work with. I have to take my time and be patient with animating so no mistakes are made.
Images of lip-syncing animation:


Finished animation:
30th September
Stop Motion
Objectives:
In this session I aimed to develop my understanding of practical skills relating to different animation methods and to begin learning editing tools for use in video post-production. Stop motion is another method of animating which is creating the illusion of movement by juxtaposing images together to create a sequence. This method mostly uses objects whereby you physically move it so that they appear to move on their own. The objects are moved with small movements between individually photographed frames. Any object can be used in a stop motion, including a person.
There were 3 factors that I needed to consider before doing stop motion. Timing - Not taking enough photos for an object’s movement. Lighting - hands and shadows of people getting caught in the frame. Spacing - Think about where I will place my camera in relation to your objects. Next, it was time to take the pictures for the stop motion.
Planning:
I brainstormed with my group for an idea with random objects which were; a red ball, a handful of sweets and a small moveable mannequin. Our idea was that the ball rolls towards the wall and explodes into sweets and the mannequin crawls to the sweets and starts grabbing them. The mannequin had to crawl because some of its limbs were broken. We did a quick storyboard of how it would look like and estimated how many frames there would be for each section.
Filming and Editing:
Once that was completed, we proceeded with getting a camera for the photos and started taking pictures. We used sticky tack to keep objects that can’t keep still from moving. For every picture we took we moved the objects slightly so that in the edit, it looks like it’s moving. After all the photos were taken, I moved all the photos to Adobe Premiere Pro to compile all the photos into an animation. In Adobe Premiere Pro, there were 6 windows which were 2 places where the footage would be shown, the files importer, the timeline, the toolbar and the audio bars. First, I dragged the photos in where I can import the media so I can edit it on the timeline. All the photos are in order to edit and dragging the first image to the timeline will create a new sequence. I dragged the new sequence to the root folder to keep it separated from the rest. Then, I dragged all of the images to the timeline. The speed of the video needs to be faster and it can be changed on the Speed/Duration. The video was finished after experimenting with the speed to make it look smooth. I found editing the speed to be the hardest, but after using it more I began to understand what the speed should be.
TV Idents
Chosen Ident:
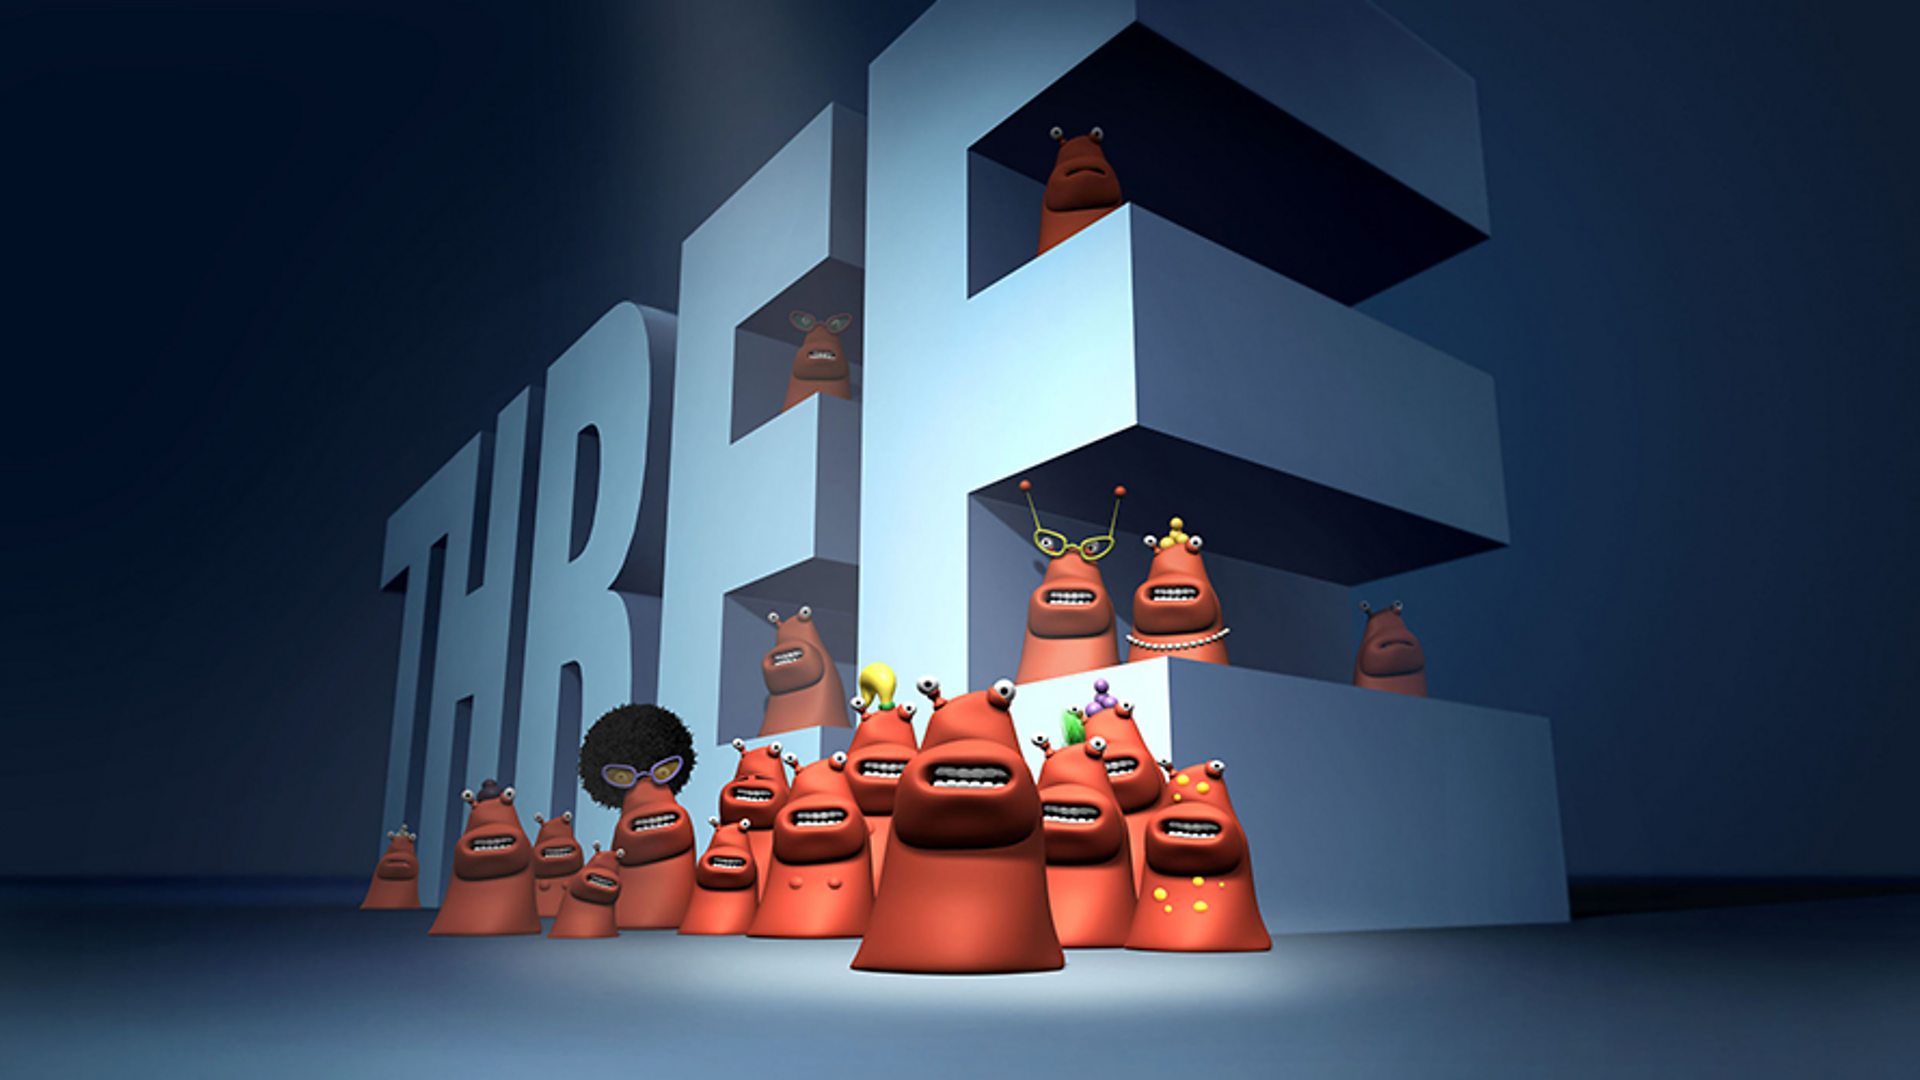
The ident that I’ve chosen to analyse is BBC Three. It uses animation and small orange characters that create humour. There is a big ‘Three’ logo behind them and has a steady camera throughout the entire ident. They are usually very quick and leave a funny, but awkward feeling. Watching them made me laugh and wonder why it was so humorous. It was because when it was evening on BBC Three, the channel started showing family friendly shows.
Bibliography: The Tech Gamerz. (2017). BBC Three Logo History (2003-2016). [Online]. Youtube. Last Updated: 14 February 2017. Available at: https://www.youtube.com/watch?v=56pGBmlt0w0 [Accessed 4 November 2024].

This is a team project for making a TV ident for our media department called ‘Stanmore Studios’. Me and my team had to look back at our previous session with idents and how they work as well as deciding what types of idents are there. We started with brainstorming ideas for what our ident will be. For example; animation, film and stop-motion are different types of styles of what is shown in an ident. We decided that we will incorporate animation and filming together as we have learnt both of these in our sessions. This is because I had a lot of experience with Adobe Animate and the rest of the team had a lot of experience with filming and editing.
Next, we had to come up with a persuasive device to capture our audience. Since our ident is about our new media department, we thought that it had college students like myself and the team. Therefore, we decided to use the ‘Plain Folks’ persuasive device which is using images of people ‘just like themselves’ so the viewer can identify with the brand. After that, we decided how to combine animation and filming. We came up with the idea that the first half of the ident will be film and the logo Stanmore Studios will be animated.
We then decided where to film in the media department. The chosen location was the new studio with new 360 degrees green and black screen curtains. The studio also had lighting sources, multiple speakers and a pc to work on and edit. Once we were there, we decided on what to film. Our storyboard is a shot of someone opening the door to reveal the studio. A panning shot of the studio with someone working in the background on the pc. The person looks back with a wink and a sparkle with it ending with the animated logo.
Testing and Filming:
Before we started, we did test shots with the camera in a podcast room where the actor would walk into the room and say ‘Welcome to Stanmore Studios’. After looking at the footage, we decided to not add any dialogue because it did not sound good with the camera, but instead put background music and sound effects. Next, we started to film our ident. We did multiple shots of someone opening the door, the panning shot of the studio and the actor looking back doing a wink. Once we had the best shots, my team started to edit the footage in Adobe Pro Premiere (the software I used for my stop-motion). Whilst they were editing the footage, I started my brainstorming on the logo.
Animating and Editing:
The logo had to be in the Orbitron font. I decided on adding a spray paint look behind the logo. I used light, cool colours and used the brush tool and changed the size to be bigger. I used three colours and wanted to blend them to make it one continuous spray. To do this, I put the colours on three separate layers and changed the opacity of the layer lower, to make it look like spray paint. What I did was already put the spray paint line and start deleting the parts of the spray paint line backwards so that when I play the animation, it looks like someone spray painting. I made another layer for the title Stanmore Studios in the orbitron font. I also added a highlight so the title would light up and go down.
The rest of the team had cropped the footage and compiled it in Adobe Premiere Pro. They also added comfy background music along with a sound effect for the spray paint. I added a sparkle gif onto the actors eyes and removed the blue background of the gif by selecting the colour key which removes the specific colour selected. The ident was finished and our team was very proud of it. However, there were problems with the ident. The spray paint just appears which looks unnatural and ident doesn't have the panning shot because we ran out time. The camera was very unstable when walking through the door. I could have added a hand holding a spray paint can, but I didn't have enough time and it was very difficult and advanced. The hardest part for me was animating the title and the sparkle and organising my time. I had to ask for a lot of help to change the opacity to make it look blended and painted. The help that was given to me has made me learn how to use more of the advanced techniques on Adobe Animate.
Finished Video/Ident:
No comments:
Post a Comment